Smash 4 Stage Builders Guide Part I - Sections A and B
Smash 4 Stage Builders Guide
This guide should serve as help to better understanding the stage builder in Super Smash Bros 4 for Wii-U. For the best results, read this guide while in the stage builder, and try each technique as you read about it.
(A) Terminology
(1-A) Soft Platform: This is what I call a platform that you can pass through. It’s just easy to say.
(2-A) A Solid: Any structure that is not pass through.
(3-A) Clipping: This is when you end up passing through a solid mass that you are not meant to.
(4-A) Weight Bar: This is the name on the progress bar that tells you when your stage is too full to make new pieces, at which point you need to erase something, if you want to add something new.
(5-A) Freehand: When drawing a shape with the grid off by actually tracing your stylus around the game pad.
(6-A) Point Plotting: With the grid on or off, using single points to plot a course for your lines.
(7-A) Blast Zone: This is the line where KO’s happen. In the editor, it is where the screen gets dark.
(8-A) Sight Zone: The Sight Zone is framed by a green line on the building space. This is the area that can be seen during a match. Anything beyond this line will not be visible during a match.
(9-A) Slide: A slide is a slope that cannot be walked on, meaning that when you hit it, you will slide down, rather than walking on top.
(10-A) Layout: The background setup that you choose for the setting of your stage.
(11-A) Skins: The pattern that appears on the pieces that you draw; there are five to choose from with each layout.
(12-A) Grid Shift: This is what I’m calling the phenomenon that happens when you draw more than one structure that overlap one another or that share boarders, while the grid is on. You will notice that only the first piece drawn exists exactly within the grid squares, all pieces drawn after that overlap or share boarders will be shifted.
(B) Simple Tips
(1-B) Getting the Grid: The grid is not on screen when you first start a build; you have to press the X button to make it appear. With this on, the points that you place with the stylus will auto snap to the nearest intersection, making straight lines, and symmetrical structures much easier.
Flickering Grid: Thanks to RetroStu (https://miiverse.nintendo.net/users/RetroStu) for pointing out to me that when your system is set to the higher two resolutions, the grid will flicker quite annoyingly. If you want to fix this, you will have to lower your resolution to 480i. To do this, go to system settings in your Wii-U menu and look for the row of icons at the bottom of the screen. The fourth icon is a TV with a Wrench; click it, then look for the sub header named “TV Resolution”, and choose 480i. If your TV doesn’t allow a resolution higher than that, then you will automatically be set to this resolution.
(2-B) Grid Counting Made Easy: Counting grid blocks to make things symmetrical, or to re-draw a piece that you want to move, is essential to the process. Try counting by two’s. This will save time and will actually help you memorize more complex redraws a little easier. Also, note that you can draw a straight line while the grid is on by plotting multiple points as you progress down the line. So, if you want to count out a long line of say, 20 blocks, you can start with a 2 block line, and add 2 at a time, counting as you go, until you get to 20.
(3-B) Undo: Besides the Undo button in the top right of the screen, there is also the ability to undo your last segment of a multi-segmented line; this is much easier if the grid is on. Let’s say that, with the grid on, you’re drawing a multi-segmented line or piece, and the point you just plotted was placed incorrectly. You can tap the next to last point, to “undo” the line back to that place. This only works once, if you try to undo a second point, or to go back by 2 points, the line will be aborted or else the structure will be finalized incorrectly. You can do this with the grid off, but tapping the last point needs to be incredibly precise. You can use this undo method more than once back to back if you are undoing a straight line by segments. For instance if you have a line that is 10 blocks long and you need it to be 8, then you can tap that line on the 8th block. Now let’s say you decide you want it to be 6 instead, you can tap it again, as long as you are dealing with a straight line.
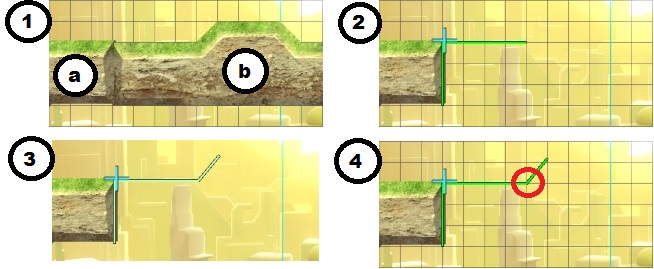
Here’s a trick you can use. Diagram (1) below shows two parts, (a) and (b). Let’s say I want to redraw (b) where the slope is slightly less than one block high. In (2) I start drawing the shape with the grid on, and come to the point where the ramp will be. In (3) I have drawn the first slope with the grid off, and in (4) I have toggled the grid back on, to see where the line ends, only to see that it is too high. With the grid still on I can tap the last directional change (the point that is circled in (4) to undo the line to that point. You might say it’s possible to simply start at the ramp, and that’s true, for this construction. But there are times when the part that needs to be drawn with the grid off cannot be the first thing you draw, so when you get to that part, if you get it wrong, you will need to start all over, unless you have a point placed on a grid intersection to which you can undo. Like I said before, you can backtrack this way with the grid off, but it is very difficult.
(4-B) Faster Camera Panning: You know the screen that has the grid? Well if panning around with the camera is too slow for you, try using both joysticks at the same time for double the speed!
(5-B) Thinner Perpendicular Walls: There is a way to get walls that are thinner than one block. First let me say that when drawing freehand, a line will be short bursts of segments. Try drawing a line freehand and notice how the green line doesn’t keep up with your movement, it lags behind and then jumps to where your stylus is located. This segmentation is the key to understanding the following description. I’m going to show you a way to get a shorter segment than normal.
Bending: At least that’s what I’m calling it. I recommend starting by turning the grid on and drawing a shape that will act as a template to ensure that your line is the right length, if the size needs to be precise. In the diagrams below, the large “C” shaped piece is my template.
Now, with the grid on or off, plot a point. Next, make sure the grid is off and plot your second point to form a straight line, but do not lift your stylus. While still pressing against the screen, bend the line to create the first short side of your wall (see the tiny top horizontal green line of (1a) below). This line should be perpendicular to your first line if you want to make a realistic wall, but making it angled can also work. If you were to lift the stylus, after plotting a second point, then the minimum size of the second line would be wider than what you can get by Bending it. Drawing (2a) is the result of me plotting 2 points, lifting my stylus and then starting at the end of the green line and drawing the shortest segment that the editor will allow. (2b) Depicts this shape completed. Notice that it is the same width as the template walls, which is one block wide. The second line (the short green line in (2a)) cannot be any shorter than what you see below if you’ve lifted your stylus after plotting the second point.
(3a) Depicts a method that can give you paper-thin walls, but both sides of the wall will not be parallel. Notice that in (3b) the completion of this wall has caused even the side that perfectly followed the blue centerline to become slanted. (a) Depicts a one block tall solid platform, (b) is a soft platform, and (c) is a solid platform using the Bend method. The only line that you need to actually draw by hand, instead of plotting points, is the first short line, so it’s not that difficult. It may take a few tries, but the results can be very nice.
(6-B) Saving Space:
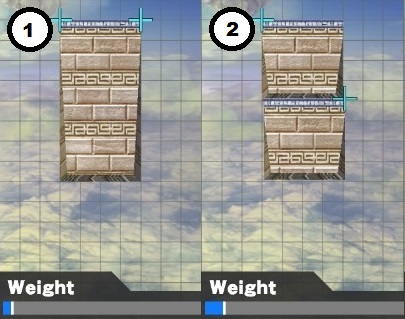
(a) Combine solid structures: If you have drawn 2 or more shapes to make up a solid mass, and they can be combined without ruining your design, then do so; this will almost always cut down on your stage weight. Below you can see on the left is diagram (1) with a single shape, and (2) on the right contains 2 separate shapes. (1) And (2) both occupy the exact same amount of grid blocks, in the exact same place, but note the weight difference.
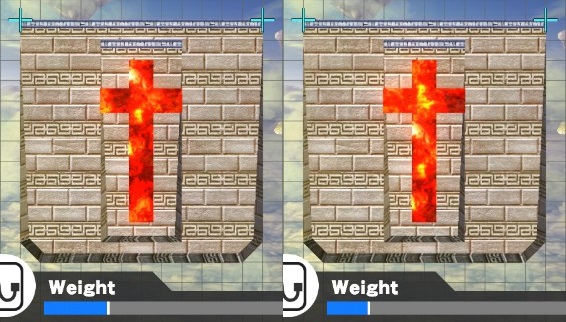
(b) LaW Trick (Lava Weight Trick): If you have lava that is drawn onto a part of a shape that over laps another shape, then click on the erase button, and tap it to the lava, which will erase some of the stage weight of the lava. The picture below shows the weight difference before and after doing this. What happens is that the lava exists on the foreground and background shapes, so you have just erased the portion on the background shape. This does not work for lava drawn on a single stand-alone shape. Notice the weight bar in the two examples below.
Also, the trick only works for the lava that is painted on the “upper” or foreground mass. Anything painted on the background mass will disappear when doing the LaW trick, whether you tap the eraser tool on an area of lava on the larger mass or the smaller one. See Diagram (1) and (2) below. Diagram (3) shows what happened when I clicked the eraser tool on the lower horizontal line on the larger piece. This happened nowhere else, and I can’t figure out why it occurred, but it’s something worth looking into.
(c) Limit unnecessary line directional changes: Drawing freehand can be fun, it feels nice, and it can lead to some cool designs, but each and every time a line changes trajectory (even the smallest angle changes), you are adding more to your structures weight. And for this reason, hand drawn lines take up a lot of space. In the diagram below, although the grid was on, so these are not hand drawn pieces, they still illustrate what I’m talking about. Note that (2) takes up less physical space than (1), but it actually takes up a LOT more room on the weight bar.
This is what I call Plot Point, as opposed to free hand. This is simply where you plot points in a form that suits your needs, rather than drawing a similar structure freehand. This method can give the illusion that your structure is more natural, and random, without taking up so much space. It also allows you to more carefully craft your terrain. This can be done with the grid on or off, but your options are limited with the grid on.
Here’s an example: (1) is a freehanded structure in my stage “Dragon Slayer”, notice that the weight bar is full. Diagram (2) is the plot point alternative that opens up some space for me to add a platform or two in some much-needed areas. You can thank the making of this guide for me learning this.
Dragon Slayer 2.0 - https://miiverse.nintendo.net/posts/AYMHAAACAAADVHj_VxGcrQ
(7-B) Getting Around the Ledge Grab Icon: In the picture below, (1) shows the blue cross that reveals the ledge grab toggle when tapped. Let’s say you want a line to start or end there, but you can’t place it because you just end up opening the toggle menu. There are two main ways to achieve this. One way is to just draw toward it. With the grid on, you can draw a line right up to these icons. Drawing (2) shows a line that is on it’s way toward the icon. Drawing (3) shows that laying down a temporary platform will cause the icons to disappear, and then after you draw your piece, you can erase the platform.


